In RatedPower, topography data from Google Earth is automatically extracted and applied to our designs. If we want to perform a topography analysis with better accuracy, we can utilize contour lines in CAD format.
This guide explains how to convert georeferenced contour lines in CAD format into a readable format for RatedPower by using the QGIS tool and how to upload them into the software.
For this purpose, we will be following these steps:
1. Isolate layers in a new .DWG file
2. Import DWG in QGIS
3. Extract Vertices
4. Export as CSV from QGIS
5. Import topography data into RatedPower
1. Isolate layers in a new .DWG file
This step is not mandatory but it will save you some time. Topography files are usually heavy and QGIS will take time to open them. For that reason, it is better to create a new drawing in AutoCAD and paste from the origin only the required information (contour lines).
- Open your .DWG file with all the information.
- Isolate only the contour lines (make sure the thickness of lines is not "0").
- Create a new drawing in AutoCAD.
- Paste from the origin the contour lines in the new drawing. You should use the command: Pasteorig (or Pegarorig in Spanish).
- Save the new drawing as 2013 dxf or 2013 dwg.
2. Import DWG in QGIS
- Go to Project → DWG/DXF-import
In order to make it work efficiently, you can follow these steps:
- Create a new/load an existing Geopackage with a fitting CRS
- Import DWG-file
- Check 'Expand block references' and 'Use curves' if needed
- Set 'Group name' of your choice
- Uncheck unwanted CAD-layers (Choose only the ones with contour lines)
- Checking 'Merge layers' is advised
-png.png?width=688&height=463&name=image%20(15)-png.png)
3. Extract Vertices
- Go to Vector → Geometry tools → Extract Vertices
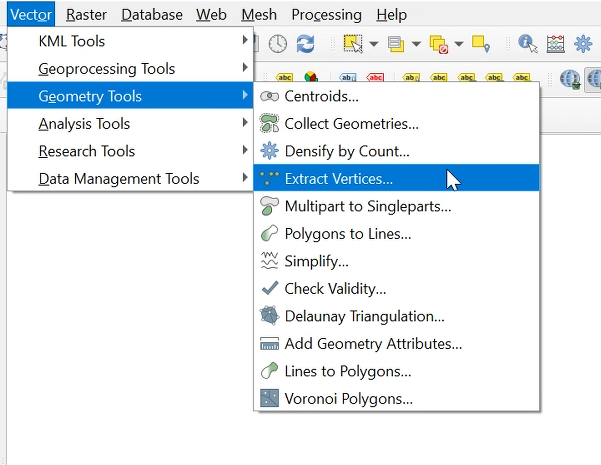
- Use a temporary layer to save those points.
-png.png?width=688&height=510&name=image%20(16)-png.png)
4. Export as CSV from QGIS
- Right-click on Vertices layer → Export → Save Features as…
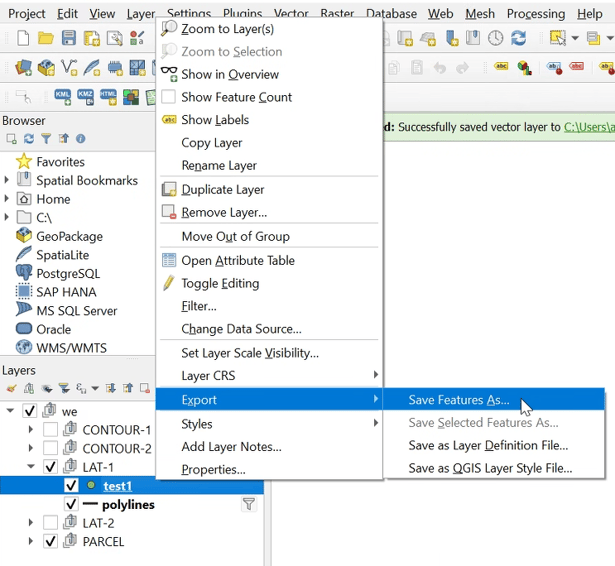
- Format → Comma Separated Value [CSV]
- File name → Select folder and give a name
- Select fields to export… → Deselect all fields to export
- Layer options → Geometry → As_XYZ
-png.png?width=688&height=604&name=image%20(18)-png.png)
Open the the CSV file and remove the header.
Check the CSV
Remember to meet the following requirements:
- The first column corresponds to the X coordinate (easting), the second to the Y coordinate (northing), and the third to the elevation value in meters.
- The file should not have any headers.
- The coordinates should belong to the same UTM zone as that of the project in RatedPower.
- The data coverage area should roughly match the site area.
- The file should not exceed the maximum file size of 500 MB.
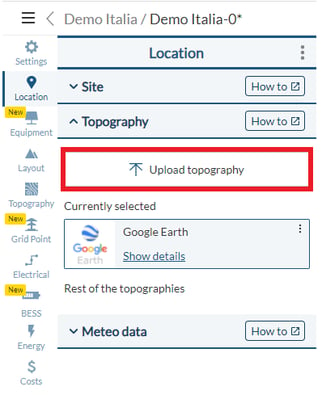
5. Import topography data in RatedPower
- Upload the CSV file into RatedPower from the tab Location → Topography → Upload topography .CSV
Based on this custom data, the topography analysis will have higher resolution data to improve the final design.
For any other questions or more information regarding this topic, you can contact us at: support@ratedpower.com