Learn what shortcuts are, what they are for, and how to create them.
Do you want to connect different parts of the same area via a road? Do you want to improve your PV plant's accessibility by adding secondary roads that connect to primary ones?
With shortcuts, you are able to do so easily.
This article aims to explain how you can define road shortcuts and show you some examples in practice.
What are shortcuts
A shortcut is a user-defined road segment that can be added to the road layout. These segments are useful to connect (via road) different parts of the same area (imagine a restricted area between the two of them) or even adjacent roads. With Shortcuts, users can influence the road definition algorithm, re-routing individual roads to their taste.
So, what does this look like?
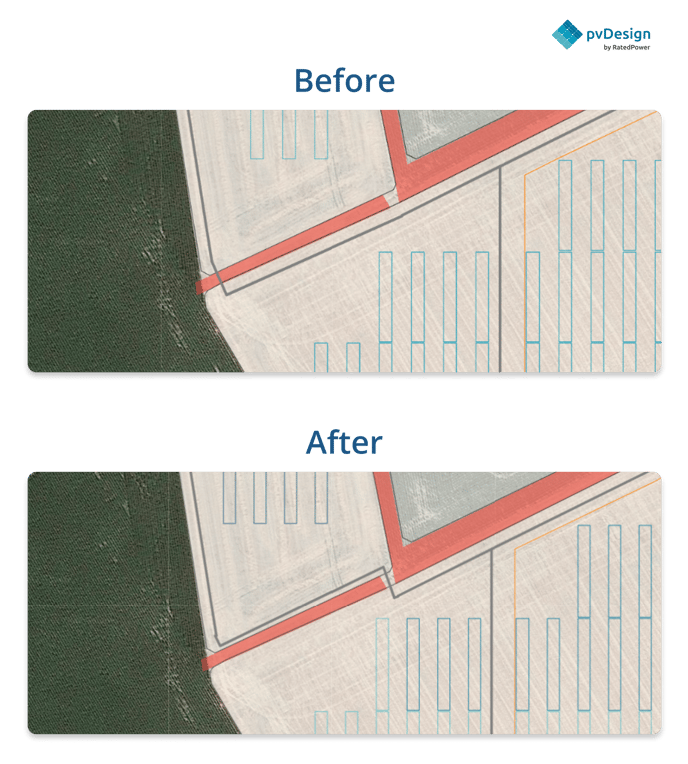
In the image below, we can see that there is a restricted area marked in red. RatedPower generates a perimeter road that goes around it. But what if, in this specific case, we want the road to go right through this RA, following the perimeter.
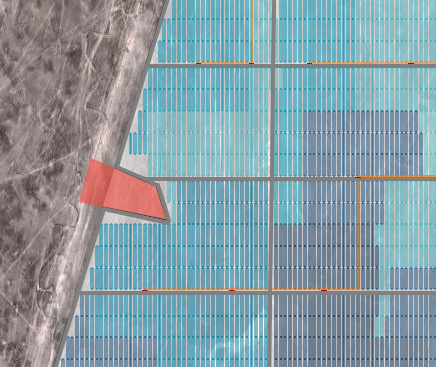
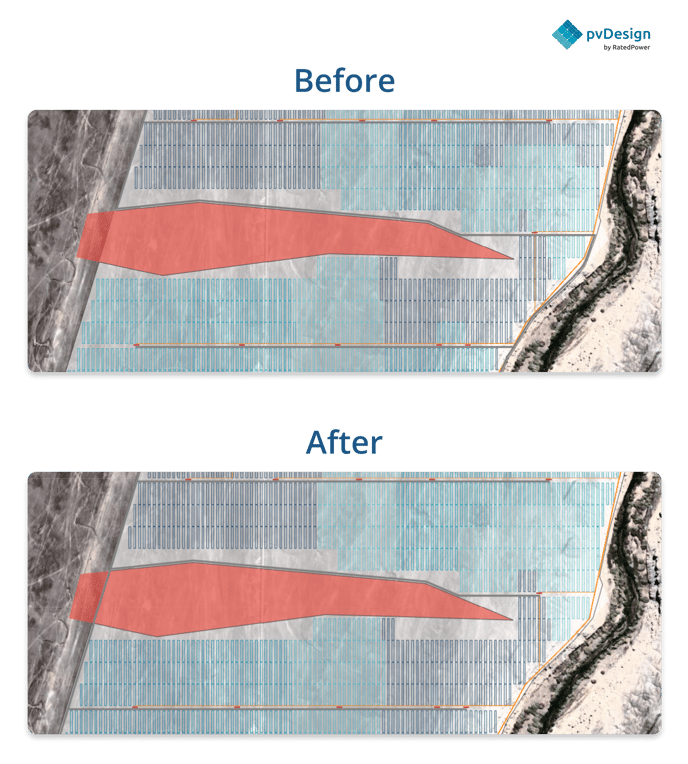
By drawing a shortcut, we can see how RatedPower traces a road right through the red restricted area rather than going all the way around it.
In this case, the difference may not seem that big of a deal. But, if the restricted area is larger...
In the above example, if instead Horizontal and Perimeter roads were selected in the layout configuration this shortcut wouldn't be accepted by RatedPower. Why?
The Restricted Area (RA) would be surrounded by a perimeter road, therefore is the perimeter road that connects opposing segments of a road.
Automatically, RatedPower will understand that this shortcut is unnecessary because the option horizontal and perimeter roads, in this particular instance, render a shortcut useless
Next, another example of shortcuts is when we're not satisfied with the placement of the roads crossing the RAs and we place two segments on an alternative placement.
Contrary to the previous image, in this particular instance by using the vertical and perimeter roads configuration, it is possible to use this shortcut. The Restricted Area (RA) would have a perimeter road surrounding it, but it does not unite separate segments. Therefore, RatedPower would accept the use of this shortcut.
Conclusion: It is highly recommended not to use shortcuts connecting the separated structures of the same block when the "Perimeter and Horizontal Roads" or "Perimeter and Vertical Roads" configurations are enabled.
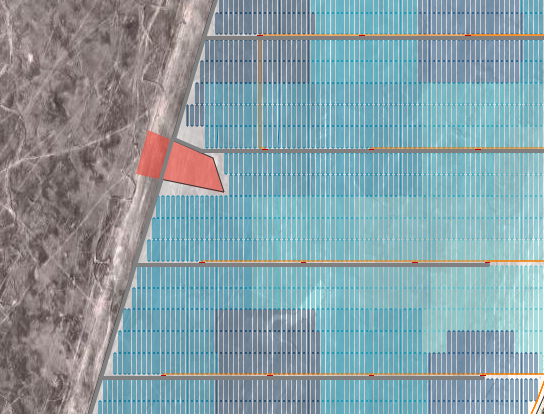
In the next example, we can see that our road is crossing the restricted area instead of going through the small corridor between the two RAs.
By creating a shortcut that goes along the edge of the first RA, we can force the road to go through that corridor, leaving the RA off-limits.
Shortcuts can help us change the layout of the roads, opting for more convenient (or shorter) alternatives.
Fishbone
Shortcuts might help if you’re interested in mixing vertical and horizontal roads (fishbone).
The road layout options in RatedPower are four: vertical roads, horizontal roads, vertical with perimeter roads, and horizontal with perimeter roads. Adding a perpendicular road to any of these options can potentially improve the accessibility of your PV plant.
Although the shortcuts feature has not been developed with the fishbone topology in mind, we have seen that the tool is fully functional in the following two case scenarios:
- For designs that use single-axis trackers, the combination of vertical shortcuts (defined as paths in Google Earth) and horizontal roads (selected in the Civil tab within RatedPower).
- For designs that use fixed structures, the combination of horizontal shortcuts and vertical roads.
Essentially, you will draw a path (go to the next section to learn how) crossing your AA. This path will become the fishbone of your road layout, from where other roads will branch out.
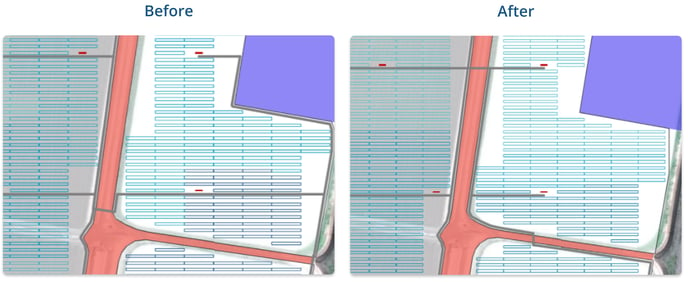
Let's take the site below as an example. We opted for trackers and horizontal roads. RatedPower needs to connect these roads together somehow in order to reach the road access. It does so by tracing a perimeter road on the left side.
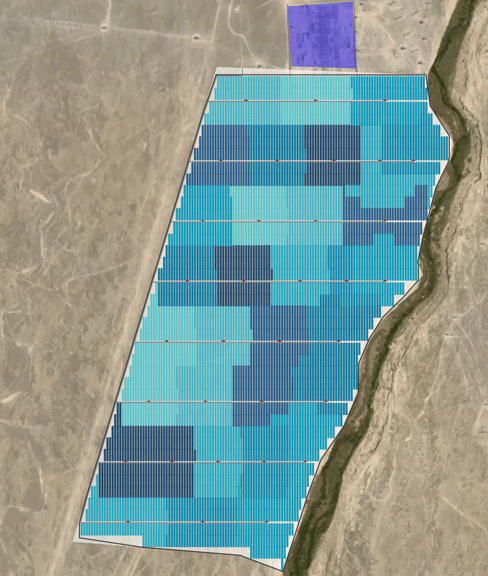
What if we want to connect these horizontal roads in a different way, one that reaches the access point in a shorter and more direct path? With Shortcuts, this is quite easy to do.
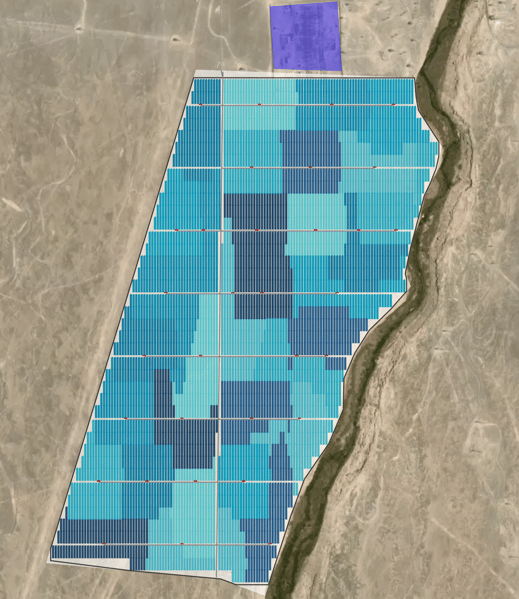
In the image below, we have defined a vertical shortcut. Now, there's no need for a perimeter road, so the software removes it and connects the horizontal roads using the user-defined path.
This specific application of shortcuts is still a work in progress. If you have any feedback or examples you'd like to share with us, please do. We're all ears!
Remarks
There are some special cases and conditions applied to the use of this tool.
- A shortcut can only be used to connect roads of the same AA polygon. It cannot be used between different areas.
- If a shortcut is connected to a road but there's extra length (appendage) and
- the extra portion of the shortcut is shorter than 10 meters: it will be removed.
- the extra portion exceeds 10 meters: it will be maintained.
- If a shortcut is partially inside the AA and partially outside the AA and
- both ends of the shortcut connect to the road layout: the shortcut will be maintained.
- one end of the shortcut remains outside the AA (or inside a RA): this extra section will be removed.
In other words, a shortcut must serve as a link between roads. Any excess road (extra segment) must be longer than 10 meters to be conserved.
How to create shortcuts
There's two ways that you can create shortcuts. One would be to do it on google earth and upload the file to RatedPower. And the other would be to create it using the site creator inside the software.
Site creator:
After getting into the site creator interface (as per the article on how to create a site directly inside RatedPower), you will be able to select the "Path" box, and choose shortcuts.
Google Earth:
After having defined your site's KML/KMZ file as per the article on how to create a site, you can opt to create optional road shortcuts. To do so, follow the next steps:
1. Open the site's KML/KMZ file in Google Earth (desktop edition)
2. Inside the initial site folder, create a new folder called "Shortcuts".
Right-click on the folder and go to: Add → Folder
3. Inside the "Shortcuts" folder, you can define as many road shortcuts as you want. To do so, you must use the path tool. You can name these shortcuts whatever you want.
Right-click on the "Shortcuts" folder and go to: Add → Path
4. The final step is to save the whole folder (in other words the main folder) as a KML or a KMZ.
5. We can now upload the KML or KMZ file to RatedPower. Done!
For any other questions or more information regarding this topic, you can contact us at: support@ratedpower.com